Vue2 的基本用法总结
响应式变量(Data)
当一个 Vue 实例被创建时,它将 data 对象中的所有的 property 加入到 Vue 的响应式系统中。当这些 property 的值发生改变时,视图将会产生“响应”,即匹配更新为新的值。
html
<template>
  <div>{{ fullName }}</div>
</template>

<script>
  export default {
    data() {
      return {
        fullname: "jungeer",
      };
    },
  };
</script>
使用计算属性(Computed)
计算属性是一种基于响应式依赖关系自动更新的属性。当依赖关系发生变化时,计算属性将自动重新计算,避免重复计算。
html
<template>
  <div>{{ fullName }}</div>
</template>

<script>
  export default {
    data() {
      return {
        firstName: "John",
        lastName: "Doe",
      };
    },
    computed: {
      fullName() {
        return this.firstName + " " + this.lastName;
      },
    },
  };
</script>
使用监听(Watch)
watch 选项用于观察和响应 Vue 实例上的数据变化。当依赖的数据发生变化时,watch 中定义的函数将自动执行。
html
<template>
  <div>
    <input v-model="searchTerm" placeholder="Search..." />
  </div>
</template>

<script>
  export default {
    data() {
      return {
        searchTerm: "",
      };
    },
    watch: {
      searchTerm: {
        handler(newValue, oldValue) {
          if (newValue !== oldValue) {
            this.fetchSearchResults(newValue);
          }
        },
        immediate: true,
      },
    },
    methods: {
      async fetchSearchResults(searchTerm) {
        // todo
      },
    },
  };
</script>
使用 v-bind 的简写语法
v-bind 可以绑定属性值,简写语法更简洁。使用冒号 : 作为简写形式。
html
<template>
  <img :src="imageSrc" :alt="imageDescription" />
</template>

<script>
  export default {
    data() {
      return {
        imageSrc: "https://example.com/image.jpg",
        imageDescription: "An example image",
      };
    },
  };
</script>
使用 v-on 的简写语法
v-on 用于监听 DOM 事件,简写语法更简洁。使用 @ 作为简写形式。
html
<template>
  <button @click="handleClick">Click me</button>
</template>

<script>
  export default {
    methods: {
      handleClick() {
        console.log("Button clicked");
      },
    },
  };
</script>
使用 v-model 实现双向数据绑定
v-model 实现了输入控件与数据的双向绑定,简化了表单处理。
html
<template>
  <input v-model="inputValue" />
</template>

<script>
  export default {
    data() {
      return {
        inputValue: "",
      };
    },
  };
</script>
使用 v-if 和 v-else 控制条件渲染
v-if 和 v-else 可以根据条件渲染不同的内容。
html
<template>
  <div v-if="loggedIn">Welcome, {{ username }}</div>
  <div v-else>Please log in</div>
</template>

<script>
  export default {
    data() {
      return {
        loggedIn: false,
        username: "John",
      };
    },
  };
</script>
使用 v-for 进行列表渲染
v-for 可以遍历数组或对象,并渲染列表项。
html
<template>
  <ul>
    <li v-for="(item, index) in items" :key="index">{{ item }}</li>
  </ul>
</template>

<script>
  export default {
    data() {
      return {
        items: ["Apple", "Banana", "Cherry"],
      };
    },
  };
</script>
使用过滤器(Filters)
过滤器可用于格式化输出,使模板保持简洁。
html
<template>
  <div>{{ price | currency }}</div>
</template>

<script>
  export default {
    data() {
      return {
        price: 1000,
      };
    },
    filters: {
      currency(value) {
        return "$" + Number(value).toFixed(2);
      },
    },
  };
</script>
使用自定义指令(Custom Directives)
自定义指令允许你为元素添加特殊行为。它们可以让你更直接地操作 DOM。
html
<template>
  <input v-focus />
</template>

<script>
  export default {
    directives: {
      focus: {
        inserted(el) {
          el.focus();
        },
      },
    },
  };
</script>
使用插槽(Slots)
插槽允许你在子组件中嵌入父组件的内容。这使得组件更具可复用性和灵活性。
html
<!-- 父组件 -->
<template>
  <div>
    <child-component>
      <template #header>
        <h1>Header content</h1>
      </template>
      <template #default>
        <p>Main content</p>
      </template>
      <template #footer>
        <p>Footer content</p>
      </template>
    </child-component>
  </div>
</template>

<!-- 子组件 -->
<template>
  <div>
    <slot name="header"></slot>
    <slot></slot>
    <slot name="footer"></slot>
  </div>
</template>
使用混入(Mixins)
混入允许你在多个组件间复用逻辑。这有助于避免代码重复和提高代码可维护性。
javascript
// mixin.js
export default {
  methods: {
    helloWorld() {
      console.log("Hello, World!");
    },
  },
};
javascript
// 组件使用
<script>
import HelloWorldMixin from './mixin';

export default {
  mixins: [HelloWorldMixin],
  mounted() {
    this.helloWorld();
  },
};
</script>
生命周期(lifecycle)
每个 Vue 实例在被创建时都要经过一系列的初始化过程——例如,需要设置数据监听、编译模板、将实例挂载到 DOM 并在数据变化时更新 DOM 等。同时在这个过程中也会运行一些叫做生命周期钩子的函数,这给了用户在不同阶段添加自己的代码的机会。
javascript
<script>
  export default {
    created() {
      console.log("created");
    },
    mounted() {
      console.log("mounted");
    },
  }
</script>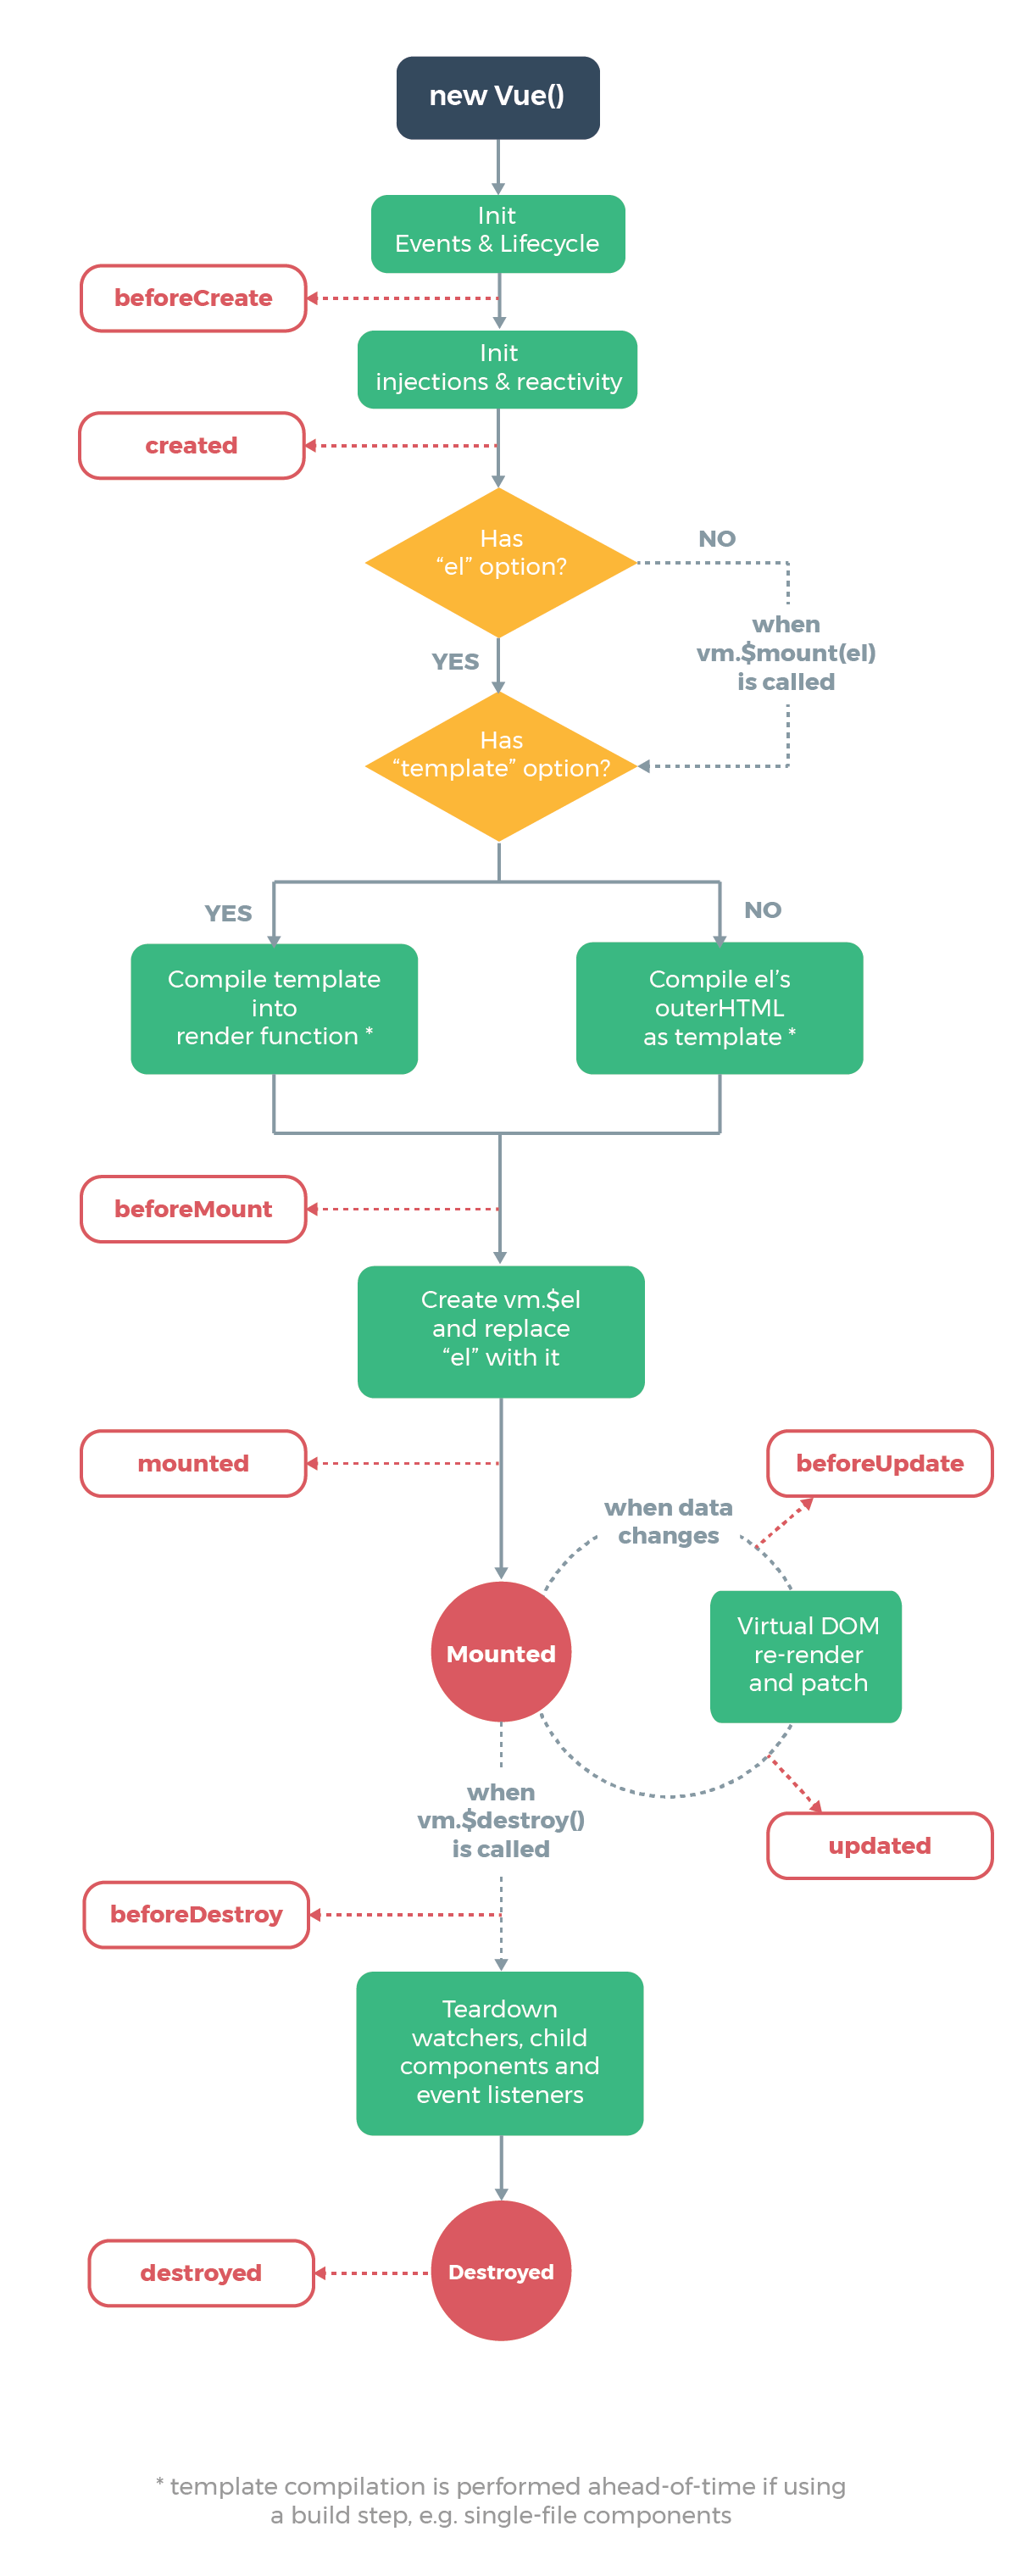
属性(Props)(【父组件】向【子组件】)
使用 props 可以接收来自父组件的数据传参(更深入使用请移步官网)
html
<!-- child.vue -->
<template>
  <span>{{ name }}</span>
</template>

<script>
  export default {
    props: {
      name: {
        type: String,
        default: "",
      },
    },
  };
</script>

<!-- parent.vue -->
<template>
  <!-- 第一种用法(不推荐) -->
  <child v-bind:name="name"></child>

  <!-- 第二种用法(推荐) -->
  <child :name="name"></child>
</template>

<script>
  import Child from "Child.vue"; // 导入子组件

  export default {
    components: {
      Child,
    },
    data() {
      name: "jungeer";
    },
  };
</script>
自定义事件(Emits)(【子组件】向【父组件】)
子组件通过自定义事件来与父组件进行逻辑交互(可以修改父组件的数据变量值,或其他操作)
html
<!-- child.vue -->
<template>
  <button @click="updateParentName">点击更新父组件 name 值</button>
</template>

<script>
  export default {
    methods: {
      updateParentName() {
        this.$emit("update-parent-name", "来自子组件");
      },
    },
  };
</script>

<!-- parent.vue -->
<template>
  <!-- 第一种用法(不推荐) -->
  <child v-on:update-parent-name="updateName"></child>

  <!-- 第二种用法(推荐) -->
  <child @update-parent-name="updateName"></child>
</template>

<script>
  import Child from "Child.vue"; // 导入子组件

  export default {
    data() {
      name: "jungeer";
    },
    methods: {
      updateName(name) {
        this.name = name;
      },
    },
  };
</script>